Machine of modules. Origami: assembly diagram
Modular origami is becoming more popular inpresent time. Even children are able to create extraordinary masterpieces from these tiny details. Only because of its simplicity, which consists in copying small blanks and creative freedom, to spoil the product from paper particles is almost impossible.

Both old and small
This expression is ideal for the creativeThe process of creating various designs of paper modules. The fact is that he is subject to all who are able to sit on the ground for about an hour. But it is so much needed to create simple models of animals, people, heroes from fairy tales and cartoons, which somehow you can interest restless children.
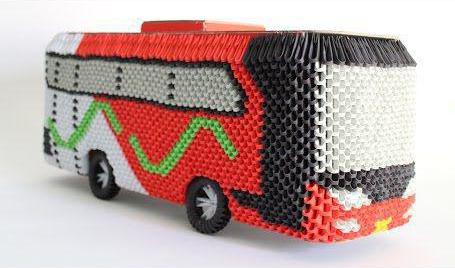
If absolutely none of the abovelist did not arouse the interest of active youth, then we suggest assembling such a structure as a machine from modules. Origami, the scheme of which will be discussed in detail below. Its feature is that it is assembled on a plane, which allows to use it in the future as a picture for interior decoration.
I blinded him out of what was
Before you start the process of creating a machine you need to carefully prepare the materials that you may need for further work:
- Paper. Perhaps, this is the most important thing that is useful in work. From its quality everything depends, from the flexibility of modules, to strength and durability. So, if a certain type of paper is very thin, then the probability that the product will crumble or break will increase several times. Especially if the children will take part in the process. The colors of the paper also play a big role, as the attractiveness and colorfulness of the crafts depends on them.
- Glue. It is best to choose less toxic options, given that they will be contacted by children. Yes, maybe they do not glue so firmly and quickly, but it's just a machine from origami modules, the scheme of which will be considered further, and not the world olympiad on bobsleigh.
Minor materials
Also for work you will need:

- A more dense version of the paper is cardboard. If it is more convenient for you, then you can take a Whatman, which can later be cut into smaller sheets.
- Scissors or clerical knife. Nevertheless, it is better to give preference to the first option, since it is less dangerous. In addition, there is a special type of scissors, designed only for children who are just starting to learn how to use them. Blades for them, often, are made of plastic, which makes them much safer.
- Ruler. If this kind of measuring instruments was not found, then you can use a protractor or a triangle.
- If you are sufficiently versed in this direction of needlework, then it's easier for you to rely on modular origami assembly schemes, rather than step-by-step instructions that take longer.
Modular origami machine: assembly diagram
The assembly scheme of the product is very simple and understandable, especially if you look at it step by step. So, this process will be performed by the child himself.
Prepare paper fragments for furthercreating a shape. Since this is a machine from modules, origami, the scheme of which is conspicuous, bright and juicy shades should be used. So, for the wheels and strokes you need black parts, for glasses and metal parts - white or blue versions, and the base of the machine you choose, based on personal taste. In our case, red.

- Begin the process of assembly from the bottom of the picture. To do this, we carefully consider the circuit, consider how many modules of different colors we need, and put them close to each other on a flat surface. Usually the first row is not fixed. But if it is more convenient for you, then grind the parts among themselves and carefully lay them out in the right order.
- It's time to proceed to the next row. Modular schemes of assembling origami are specially created in such a way that the buyer, whether he is an avid creator of paintings from paper or just interested in a beginner, was simple and understandable while working with the picture. Therefore, you can easily find out what you need for the second row and fix the details in the right places. Again, if you prefer, then fix it with glue, and then dry the rest of the fragments in the desired position, so that there are no excess bends and creases.
- So, row by row recreate the machine according to the scheme. The number of modules should not change throughout the process, and if this happens, then it is necessary to count all previous series and, having found the error, disassemble to the correct number and fix everything.
- When all the ranks are finished, then you can carefullyglue the back side to give the product strength and strength. As it turned out, origami "Machine" of modules, the scheme and the whole process of creating which is extremely simple, you can add yourself.
To decorate
We did not in vain learn to make modular origami"Machine", the scheme of which turned out to be not so complicated as one might think. Now this hand-made thing can decorate the room, turning it into a picture, a stand under the organizer. Also, you can just give it to family and friends.