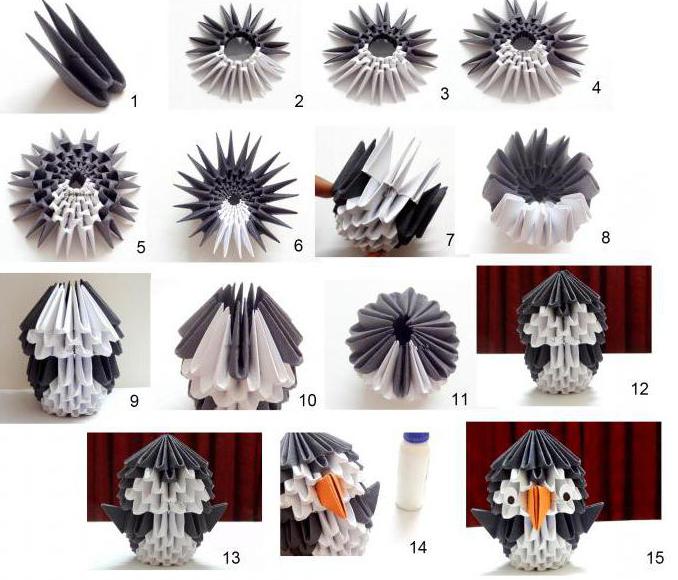
Origami creation: a modular egg
Every Sunday after the spring full moon celebrate the bright holiday of the Resurrection of Christ - Easter. The attribute of the holiday, of course, is the Easter egg. It symbolizes a new life.
In this article we will teach you how to make yourhands using the technique of 3D origami "Easter Egg." After reading the entire article until the end, you will understand the principle of work and you can easily come up with your own scheme of the Easter egg and reproduce it.

Egg modular, origami: master class
To complete the work, 273 triangularmodule. The color scheme can be different. You can use all modules of the same color or, as in our example, two color shades. If desired, the color gamut can be increased. One sheet of A4 paper produces 32 parts.
Let's start preparing. To do this, consider how many sheets we need: 273 parts divide into 32 pieces. It turns out, approximately, 9 sheets.
It is worth considering the fact that in no case,making origami "modular egg" you can not use thin sheets of paper, since the module will turn out to be fragile and can tear during the assembly process. If you still have only thin paper at your fingertips, then try to make modules from two layers.
The principle of obtaining blanks for modules
Getting Started:
- Fold the sheet A4 in half, cut, then work with each half of the sheet separately.
- We take one half and also add it in half. Using a clerical knife, cut the fold line.
- Folding the two halves together, again combine the angles and cut off in the middle of the fold.
- So repeat until you get a workpiece sheet size of 5.5 x 3.5 cm. If everything is done correctly, then from one half of the sheet you will get 16 pieces.
- Similarly, do with the second half of the sheet.
If you work with both halves at once, the last cuts may be inaccurate or you may not be able to make them because of the thickness and then collect a beautiful modular origami egg.
For beginners, it is best to cut each bend separately with a knife, then it will be flat, and the details will be standard. This will help you to collect a praiseworthy product.
Creation of details for origami "modular egg"
Now you need to add 273 triangles with two pockets from the obtained pieces. We execute these modules for origami "Easter Egg" as follows:
- We take a rectangular billet, measuring 5.5 cm x 3.5 cm, fold it in half horizontally, so that the sides of a long 5.5 cm are joined.
- Bend the resulting part in half vertically and unbend. This is necessary in order to map the middle of the rectangle.
- Fold the edges of the rectangle to the middle, that is, to the fold that we have outlined.
- We turn the resulting product.
- The bottom edges, resulting in the bending process, are raised upwards. It should be, in the end, a detail in the form of a paper cap.
- We bend the remaining corners through a large triangular piece, as if bending around it.
- Unbend the edges that raised from below.
- Then repeat steps 6 and 5 in the reverse order. First, bend the resulting corners of the corners, and then raise the lower edges up.
- The resulting detail is bent in half, corner to the corner.
In the end, we get a ready-made module that has two corners and two pockets, about which we wrote at the very beginning.

Building modules
As you can see, the modular origami-egg, the assembly diagramwhich was provided above, it is not difficult to do. A small difficulty can be overtaken at the very beginning, but if you adjust, then with this you can easily cope.

We begin with the assembly of a circular series. Since the second row holds the modules of the first one, it means that we collect two rows at once, and the next ones are added to the product on the 1st row:
- In order not to confuse the number of modules in the rows, put yourself two piles of 8 pcs. in each, to your right and left. This is the number of modules needed for a single row.
- Take the two modules on the right and add them one to the next, then take one module from the left and insert the corners into the pockets located in the middle of the first and second module from the right hand cluster.

- We attach the third module to the second, from the right side of the first row and, inserting it into the pockets, we catch it with the help of the second module of the second row.
- Continue, then adding the 4th module of the 1st row and the 3rd module of the second one.
- We also do this until we reach the 8th module of the first row. It must be connected in a circle with the first eighth module of the second row.
These first two rows are very heavy in the assembly, as it is necessary to hold all the parts tightly together, so that they do not fall apart. In them, we spent 16 white modules.
The third row is much more convenient to do, in comparison withthe first two, but it is still worthwhile to hold the entire structure tightly to avoid breakage. Just count 8 modules and in the same way we insert them all into the pockets of the second row. On this third series of origami construction "modular egg" is over.
Increase of modules in the construction
In the fourth row, we change the color, if desired. It will be necessary to increase the number of modules to 12 pieces. We increase it as follows:
- It is necessary to insert the module into the pocket of the previous row with only one corner, and leave the second free, so make it to the middle of the structure.
- In the middle of the row we insert into both pockets and continue to the end - the last two corners again in two pockets. Thus, we get a series of 12 modules.
The total number of modules spent is 36.

- The fifth row is again white, 12 pieces. Do the same way - each corner of the module in your pocket.
- The sixth row is increased to 18, the assembly occurs with white corners.
- The seventh row is also 18 white modules.
- The eighth row is 18 pink details.
- The ninth row is increased to 27 white.
- The tenth and eleventh row - also on 27 details.
The total number of modules was 183 pcs.
Reduction of modules in the construction
On the 12th row we begin to reduce the number of modules. You can use the method of skipping corners or in one pocket you insert 2 corners, try any of them and understand how it will be more convenient for you to work.
In the event that you use insufficiently dense paper, the way "several pockets in one pocket" will not work, since the whole origami design "modular egg" may burst.
- So, in this series there should be 18 pink modules.
- Further thirteenth, fourteenth and fifteenth rows we make on 18 details of white color.
- The sixteenth row is equal to 12 modules of pink color.
- The seventeenth and eighteenth series are 12 white. They will be the final in our design of a modular Easter egg. </ ul </ p>