Few users know how to create a screen,what is it and what is it for? Under this concept is meant a snapshot from the screen. Of course, before you know how to get it, you need to figure out what it's all about, and right now we'll talk about it.
Screen: what is it and why is it needed?
Screenshot can be made in order to savesome interesting information, for example, on the page of the site, because at any time this resource may no longer be. Screen captures can be used to prove something or use it in order not to rewrite any information, but simply create a picture and transfer it to another person. Also such functions can be claimed by the technical service staff, for example, if you do not run a game or a program and you decide to contact the service, then you may need a picture of the error. For example, a snapshot may be required to confirm certain actions, very often such solutions are used to confirm the claimed data when selling any digital products and so on.
PC
For what purpose is the screen created, what is it andhow to use this solution, you already know, now it's worth talking about how to take a screenshot on your computer. To date, there are many specialized programs with which you can make a photo display of the monitor. You can do everything you need with the help of a special button "Print Screen". Now we will look at each option separately, and after studying these instructions you will be able to decide which one will be optimal for you.
Easily

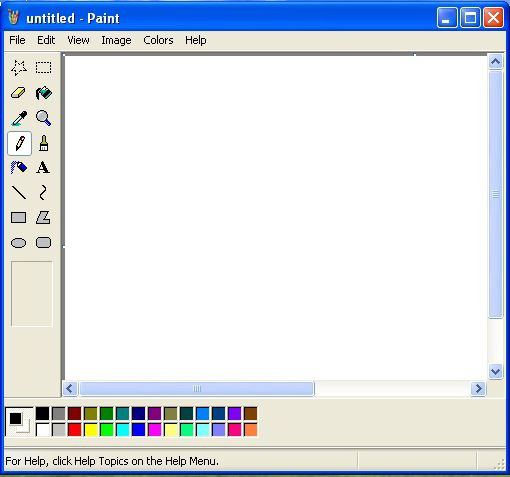
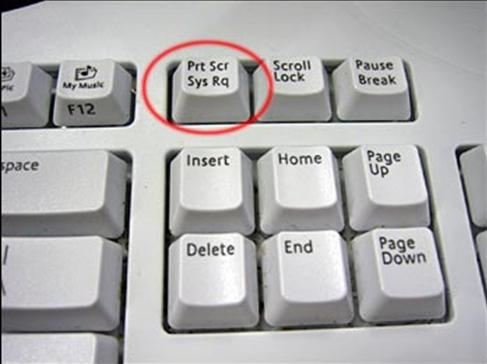
First of all, we consider the simplest and most convenientoption. In order to take a screenshot, you will need a graphic editor. You can use a standard application, for example, it can be a Paint program. If you want, you can use a professional tool, however, you will need to download and install it. The professional editor can be referred to the program Adobe Phtoshop. So, let's start talking about how to make a "Print Screen" and save the resulting image. First, we select the window on the screen, which must be transferred to the photo. Next, press the "PrtScr" key, it is located at the top of your keyboard. It is the "Print Screen" button that is used to create snapshots. After pressing the key, the image enters the clipboard. If you press Alt + PrtScr, then the photo of the active window will be copied, not the entire screen of your computer.
Working with a drawing
In the next step, you will need to usegraphic editor. As we wrote above, you can use the standard Paint program. After the application is opened, you need to insert an image from the clipboard, for this use the keys Ctrl + V. The created photo should appear in the program window, and then you can simply save it on your computer or edit it at your discretion. In the editing plan, you can use some overlay, change in color, size, and so on. Of course, it is recommended to use professional software to edit the received pictures, since there will be much more opportunities for you. The program for the screen can be used as the simplest, and with additional functions. As we already mentioned earlier, at present there are many solutions, and the choice will depend only on your needs. There are specialized programs for creating snapshots of the display in automatic mode. Accordingly, if you plan to often make screenshots, then you can set the interval function. In this case, images will be created in automatic mode. Most likely, you already could understand that if you decide to use a specialized program to create a photo display, then you will not need to use an additional editor. Some applications for creating screen shots can also record video, everything that will happen on your monitor. Such solutions are necessary so that you can find out what the user did in your absence.
Conclusion

Now you probably figured out what are theoptions for creating a screen, what it is and under what circumstances it is advisable to use this function. If you could not immediately decide on one of the options for creating snapshots, then we recommend that you try each of the proposed solutions. Now you can tell others about all the subtleties of the described function, and if necessary even teach those who want to create screenshots. Surely you yourself have already been able to understand that such photos are very easy to make, and we hope that our article helped. Thank you for your time. Now you can take a screenshot at any time.