How to enable spelling in the Word: instruction. How to use the check
Everyone commits mistakes. In this case we are talking about spelling errors. When writing, and especially when typing in text editors, the user can make a mistake by typing a particular word. This happens for various reasons, such as ignorance of the rules of the Russian language or a simple typo due to speed dialing. But at the time of technological progress, text editors are able to automatically detect all errors and suggest ways to solve them.
In this article we will talk about how to include spell checking in Word, how to use it and about many other things, which somehow relates to correcting typos in the typed text.
Enable spell checking
Initially, it is worth paying attention to howinclude in the "Word" spelling checker. Although by default, after installation, it is enabled, for some reason the user can turn it off, without knowing it. In such cases, use the instruction, which is attached below, to resume the operation of this tool.
- On the main page of the program, click the "File" button, which is located in the upper left corner.
- In the menu that appeared, go to the "Options" section.
- In the appeared window click on the item "Spelling", located in the panel on the left.
- In the "When using spelling in Word" menu, put all the checkmarks next to the items.
- In the "File Exceptions" menu, uncheck the checkboxes that are located there.
- Click OK.

Now you know how to include in the "Word"automatic spell check. After you have completed these steps, you do not need to restart the program, all changes take effect immediately after you click "OK."
We check spelling in automatic mode
After you learned where in the "Word" includespell checker, you can immediately go directly to the use of this tool. First of all, we will analyze the execution of all actions in the automatic mode. This does not mean that you do not have to do anything, on the contrary, the program will automatically tell you the alleged errors in spelling, and you will decide what you need to do to correct them.
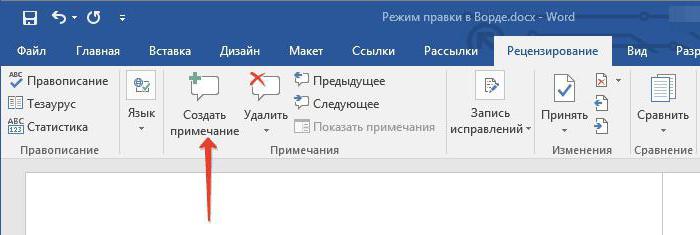
So, suppose you have opened a document inwhich has errors. In this case, they are underlined by colored lines (red, blue or green). To start fixing them, you need to open the toolbar "Spelling." To do this, press F7 or the "Spelling" button, which is located in the "Reviewing" tab.

After that, a panel appears in the right side of the window"Spelling", in which all actions will take place. Immediately in the text a problem word will be highlighted, and you will need to decide what to do with it. There are four choices to choose from:
- Skip - you skip the alleged error and go to the next word, while the selection disappears from it.
- Skip all - you miss all the errors in the text, removing them from the selection.
- Add - you add a word to the dictionary of the program so that if you find the same error, the program does not perceive it.
- Change - you change the word with an error to the selected from the list of suggested.
- Change all - you change all such words with errors to the one selected from the list.

Knowing the value of all the buttons on the panel, you can easily fix any errors in the text. In an extreme case, if no correction is true, you can replace the word yourself.
We check spelling in the manual mode
You already know how to enable the "Vord" checkspelling in automatic mode. However, this is not the only way to correct all errors in the text. Now we will look in detail how to enable the spellchecker in the "Ward" in manual mode.
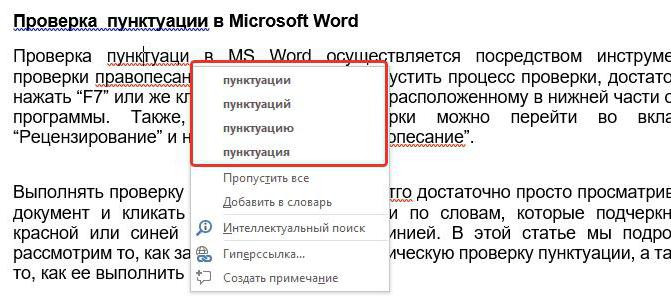
To perform the task you needInitially, pay attention to the underscores themselves in the text. We already know that these are mistakes. You can correct them not only by pressing F7, but also with the right mouse button (PCM). This is done simply: move the cursor over the underlined word and press the RMB, in addition to the usual items, additional buttons appear in the context menu that duplicate the buttons in the "Spelling" panel, their meaning you already know. All that remains is to select the necessary action and click on the appropriate line.

Conclusion
Now you know not only how to turn oncheck spelling in the "Word", but also how to use it. As you can see, the essence is simple, you just need to specify the desired action, and the program will replace everything yourself.