Replacing the front wheel stud. Replacement and repair of front wheels
It happens that the stud fastens the wheel goes outout of service, and secure it securely on the hub is not possible. Often this happens with frequent removal of the wheel. Damage can be different - it is a breakdown of the threaded part, a broken hairpin or its curvature. Depreciation occurs because of inadequate care for that. There is dirt and sand, which in turn plays the role of abrasive. The cause of wear is also a badly tightened nut. Bummer details can be due to metal fatigue, from a strong impact and from the moment of tightening the wheel nuts. As a result, movement on the machine becomes unsafe. This fact can cause more serious damage and traffic accidents.
The solution to this problem
When this type of failure occurs, the front wheel stud must be replaced.

Given the brand of your vehicle,The replacement process can occur both on the removed hub and directly on the car. This is due to the design features of the machine. But, as a rule, you can make repairs without removing the hub. Almost every motorist can install the stud himself. It is enough to have the necessary tools and a little experience in repair work.
But what if the hairpin broke off on the road? In this case, it is almost impossible to eliminate this malfunction. In view of the fact that the wheel is attached to the hub by a certain number of studs (from four to six, the exception of "OKA" is three), you can get home or to SRT for the remaining ones. Initially, it is necessary to check the tightness of the wheel nuts and move very carefully, avoiding large bumps, and not gaining high speed. Replacing the stud of the front wheel hub is not a very laborious process, but requires certain skills and patience.
How to dismantle an unusable part
The following are ways to eliminate thismalfunctions on the example of several "folk" brands of cars, both domestic and imported. In principle, the repair work does not differ significantly in its technology, but there are some differences related to the device auto.
Replacing the front wheel stud - Toyota
In this case, the object of repair will be a Toyota Corolla.

Step-by-step replacement process
For work, a standard set ofkeys, hammer, insert, balloon wrench and jack. The vehicle is mounted on a flat surface and is placed on the parking brake. Next, we release the wheel nuts and, under the auto, we remove the wheel.
After the preparatory work, the brake caliper must be removed.
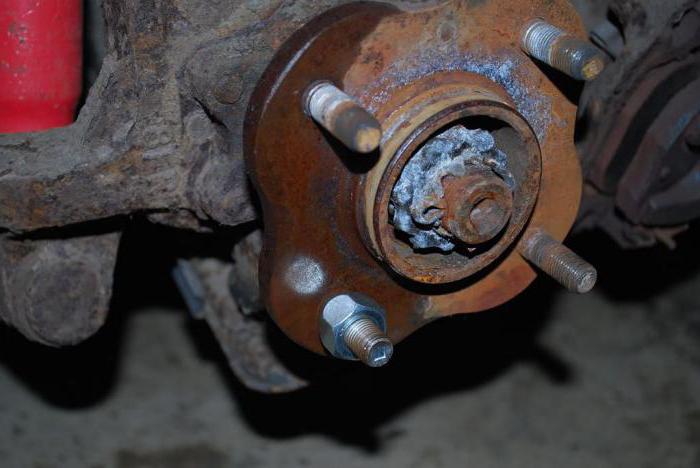
On the inside of the hub is provideda technological connector for dismantling and mounting the stud. We rotate the hub so that the damaged pin is located opposite this connector. Then, using a hammer, we knock out the hairpin. If it is safely held in its seat, then it must be treated with WD-40 or diesel fuel and allowed to slightly acidify. After that, the dismantling will be easier, if necessary, you can use the tutorial.
After removing the damaged part in its placeinstall a new one. Installation is the same as removing. When the hairpin has taken its place, you should hold it with the wheel nut so that it snugly seated in the brake disc. Replacement of the front wheel stud (Toyota Camry, among others) was successfully completed. If it is necessary to replace the remaining hairpins, the operation takes place in the same sequence.
It should be noted that the new bolts are not desirableApply nuts that have been installed on old studs, since there is a possibility of damage to their threads. This can eventually lead to rapid wear of the new product package.
Repair process at VAZ
Replacement of the front wheel stud ("Niva" including) is carried out almost the same as the previous car.
The car is hung out by a jack, removesa wheel, a support and a protective brace of the brake mechanism. Then the hairpin-bolt is knocked out with a hammer, having preliminary compared it with a cut-out for dismantling. To the wheel hub does not rotate, you need to turn on the first gear. The seat is cleaned of dirt and rust and then a new bolt is installed in it. On the body of the stud and in its mounting there are longitudinal slots.

Replacing the front wheel stud with hub removal
Let's consider an example of replacement of a detail on cars "Matiz". Removing the damaged part on this car is impossible without removing the hub, as the brake disc stops.
The first thing to do is extract a rotary fist,the brake calliper assembly with the pads and is retracted to the side. From the first untwist steering draft. Then the hub mount is dismantled to the stand, the ball support is unscrewed and knocked out. Preliminarily unscrew the hub nut, remove the hub, and the drive shaft is fixed so that the SHRUS does not come out of the gearbox.
In the future, the hub is dismantled and access to the studs appears.

Removal and installation of studs on "Chevrolet"
First of all, all the preparatorywork for unhindered access to damaged parts. The wheel, caliper and brake disc are dismantled from the wheel hub. For ease of access to the screws of the penultimate one, it is necessary to change the position of the hub rotation by the steering wheel. Replacement of the front wheel stud ("Aveo 1.6" including) is as follows. The unsuitable part is pressed with a hammer using a wooden spacer, and a new hairpin is mounted in its place. Next, the entire assembly is assembled in a reverse order to the removal.
As you can see, the dismantling and installation of a new kitthe front wheel hub bolts, are quite feasible at home. Replacement of the front wheel stud (Lacetti including) is the same, except for one - because of the hub design, the brake disc is not removed.
Repair of studs
Often motorists do not recommend to producerepair of bolts. First, it is not always possible to do (bummer and curvature). Secondly, the safety of driving a vehicle is reduced. But still they can be restored.

Care
In order not to face such a problem asbreakage and replacement of a pin of a forward wheel, it is necessary to watch a degree of a tightening of nuts. When released, the disc is beaten against the hairpin. This leads to their breakage and wear of the threads. Before you remove the wheel from the car, you need to carefully clean the bolts from dirt, so that it does not hit the threads of the threaded joint. The same operation should be carried out and before winding the nut.

Additionally, it is necessary to checktightening nuts and bolts after visiting the tire fitting. There is a high probability that in a hurry the service worker may not reach the wheel and this will damage the hairpins at best.